Tuesday, November 24, 2020

November 24, 2020 - Trees Removed at the Lake Lot

Daughter Alexa came down from St. Louis last night to help with a project at the lake lot. We had two cedar trees we wanted to cut down because they weren't providing much shade and were interfering with better trees on the lot. Alexa, Kelly and I went out this morning, cut the two trees down and piled up the branches.  Here is a picture of me working on the second tree which was actually forked.

Here are pictures of each stump, one on each side of the steps.


The trees weren't that big and they fell exactly where I wanted them to. I will come out later and cut the stumps down to ground level to lesson a trip hazard. 

Lots of branches spread all over the area as I cut.


I cut the trunks in blocks for campfires and the branches were piled up for burning. Here is a picture of each pile of branches and a picture of my help as we ate a sandwich for lunch. In the background behind Kelly you can see the row of cedar blocks for campfires.


I am happy to report that my new chain saw worked flawlessly after having been repaired due to debris in the carburetor from the factory. 

We had the time today to burn a lot of the branches but it was just too windy to risk it. Since we are heading south on Monday they will just have to lay there until spring when we get back. They will be good and dry by then and will burn quickly. We will bring Homer out and burn branches while camping for a couple of days. 


Saturday, November 14, 2020

November 14, 2020 - Replace Vacuum Door Connector

The new inlet for the vacuum in Marge arrived today. Although it is from the same company and is the exact part number, it is different.  They have changed the way the door mounts and the way it connects electrically.  Here is a picture from the front and from the side.


It is a rainy day so I decided to mess around on it and see what I could get accomplished. When I worked on the inlet the last time I had to unload everything from the front compartment and take down the wall to get access to the hose to reconnect the vacuum.

The old inlet mounted with four screws to a metal plate behind the wall paneling. The new one has two screw holes for mounting it into an electrical box. There has probably been an update in the electrical code that now requires it to be in an electrical box even though it is a low voltage wire to turn it on. 

Because of the new design the new inlet would not attach to the metal backing plate. Upon looking at the situation I decided that if I cut the metal backing plate out I might be able to connect the vacuum hose to the new inlet from the inside.  I got busy with my Dremel tool and cut the metal plate into a couple of pieces and pulled it out. Once it was out, through the double wall, I could see the plastic hose laying about six inches below the inlet opening. I thought if I could get ahold of it I could pull it towards me and connect it to the new inlet from inside. Trying to retrieve an inch and a half PVC fitting six inches away through a double wall with a two and a half inch by two and a half inch hole proved challenging. I was finally able to get under it with a piece of coat hanger wire and lift it up. Once I had it up even with the hole I was able to grab it with needle nose pliers and pull it into the room. Luckily there was enough hose to pull it in about four inches so I could connect it.

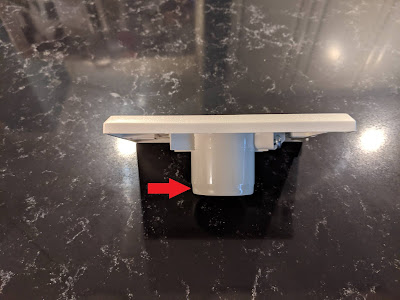
The next problem was that the pipe fitting on the back of the new inlet was smaller than the old one and therefore did not fit tight in the inch and a half PVC pipe. I didn't want to just Duct tape it on because this fitting needs to be tight for suction. Plus Duct tape tends to dry out over time and the hose could fall off in the wall. I needed a thin "O" ring to go around the fitting on the new inlet. In looking at the old inlet I noticed it had such a ring around it which sat in a groove. The new inlet did not have any such grooves. I pulled the "O" ring off and put it on the new inlet but it was too tight for the PVC fitting to slip on. I noticed that the pipe fitting on the new inlet is tapered on the end. Here is a picture with arrow pointing to the taper.


I moved the "O" ring to the taper and pushed it on to the PVC fitting. Once I got it on straight it pushed into place and even became very difficult to turn. A good tight fit. I don't think it will ever come off on its own. Making this connection saved me all the hassle of pulling everything out of the front compartment and pulling down the wall to access the vacuum hose for connection. YES!!!!! I then marked holes for mounting of the new inlet and screwed it to the wall. Here is a picture of the finished project.


I think it will work fine but if the two screws, which are just into the 3/16 inch plywood, do not prove strong enough I will have to figure out how to reinforce the inlet mount to the wall.  One thing I like about the new inlet is that it does not have a switch which turns on the vacuum when the door is opened. That is how the old one worked. This one relies on pushing the hose into the socket with the metal band on the hose completing the circuit and turning on the vacuum.

This should be the last project on Marge before we leave for Florida the end of this month. I have some outside projects planned when I get down there and need something to do as we isolate and social distance.


Friday, November 13, 2020

November 12, 2020 - Getting Bored - File Handle Project

It is getting colder outside so I need indoor projects because we are basically on Covid lockdown. I was using some files the other day and realized that some of my file handles are VERY crude. Here is a picture of five homemade handles I pulled out of the drawer. 

The one on the left I made from a broken plastic spatula handle. It works and is comfortable to use. The second from the left I made from a broken ice pick. It works ok as well. The other three I guess I picked up over the years. I didn't make them. The one in the middle is just a piece of  5/8 inch dowel. The next is a just a 3/4 x 1/2 inch block of wood. The one on the far right is almost an inch and half in diameter and is just a large piece of a tree branch with the bark still on it. 

I got some wood scraps out of my burn bin and glued some pieces together to make some new file handles on the lathe.  Here are the four I made. 


The one on the left was made out of a piece of treated 2 x 4. The other three are made out of scraps of white oak. I used pieces of cooper tubing to keep the wood from spreading out when the file is driven in. I made a couple of different shapes. Time will tell which shape is the most comfortable. I think they came out pretty nice for just a little effort.  I'll be replacing a few of the homemade ones above.


Thursday, November 12, 2020

November 12, 2020 - Another Little Marge Project

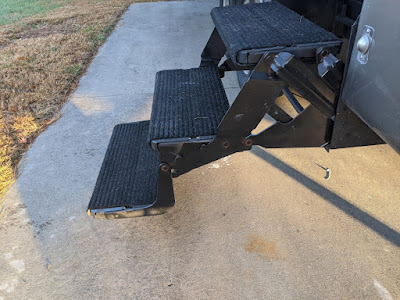
Our fifth wheel has three steps that fold underneath for travel. Here is a picture of them extended. 

They hang off the side of the rig when extended. Stepping on them causes the camper to shake and, since they are hinged in several places to fold up, they have a lot of "give" to them. Sometime back we bought two adjustable legs which are made to be put under the bottom stem for stability. Here is a picture of those supports. They can be adjusted for step height by moving the pin to different holes in the stem and by turning the top to screw it up or down for a firm fit.

While they do stabilize the steps they have been a problem for two reasons. One is that the bottom of the step is not flat so the round support is only resting on an area about a half inch in width.  Here is a picture. The red arrow shows the rounded ridge in the center of the bottom step. The supports rest on this alone.


The second problem is that we have installed rugs on the steps to help cut down on dirt carried into the camper by our shoes. The green arrow points to the wire ties hold the rug on the step. You can see that the rug is in the area where the supports would rest.

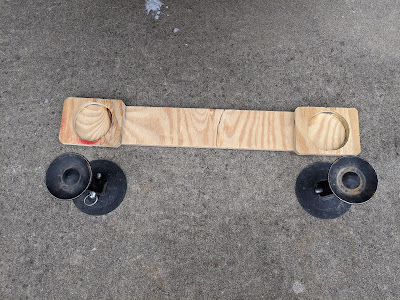
Because of these two issues the supports have trouble staying in place. I decided to make something with some scraps of wood to hopefully solve that problem. Here is a picture of the underside of what I came up with.

The supports sit in the round holes on the ends for maximum step stability. The board connecting the two square pieces keeps them from moving about under the step. Here is a picture of the piece ready to be installed.


I say "installed" but there is no installation. The board and supports are just placed under the bottom step and the height of the support adjusted for the terrain.  Here is a picture of the board in place.


If all works well. I will paint it to make it look nicer and to protect it from the elements. It is easy to store, we just throw the parts inside the door for easy access when we park.


Saturday, November 7, 2020

November 7, 2020 - Fantastic Vent Spruce Up and Vacuum Cleaner Connector Door Fail

Today I decided to take apart the Fantastic Vent in the kitchen of Marge and paint its parts because, being plastic like the AC vents, the parts had all yellowed. As I unscrewed the trim piece two corners broke off at the screw holes. This happens a lot with old plastic. I superglued them back on until I could reinforce them on the underside with JB Weld.  Here is a picture of one corner JB Welded. JB Weld is great for such things. It sets up hard as a rock and sticks well to plastic. I will smooth off the patch with my Dremel tool before reinstalling on the ceiling.


I also painted the fan screen. I had to cut a piece of cardboard round to put on it so only the rim would be painted, not the screen. Here is a picture. It came out great using flat white paint.


Here is a picture of the painted trim piece that transitions from the ceiling to the fan. I'm happy with how it looks as well flat white.


Here is a picture of the fan without the trim and screen on it. The plastic that is still up there has also yellowed. It will be a major project to pull the whole fan unit out and to remove the lift motor and switches in order to paint it. I'm leaving it as it is for now. If it bothers me too much I'll pull it apart sometime and paint it.


I cleaned the plastic and the fan blades so the trim and screen can be reinstalled tomorrow when the paint is dry on those pieces.

I then proceeded to vacuum the rig, mostly to get up the dead beetles on the floor, etc. Marge has a central vacuum so I plugged it in and got to work. When I finished I pulled the hose from the wall connector and here is what happened.


The part that attached the outlet door to the wall outlet literally disintegrated. Pieces just fell off everywhere. A year or two ago the outlet door cracked and I glued a piece of wood on it. Here is a picture of the front of the door with that patch.


There is no way to fix this door now. I got online and ordered a new outlet door. It will be here in about a week. Easy enough to install right?  Wrong!!! When the door broke the last time I learned that to attach the door I have to pull the entire outlet out from the backside of the wall. That means that I have to take everything out of the front storage compartment and remove the back wall inside the compartment to access it. A real pain because the compartment is totally loaded for the trip to Florida. 

When the hose connector door is lifted (or now off) the vacuum runs. I can pull the plug on the vacuum to stop that and deal with it later but I have the time and tools now to repair it before we leave. The new connector door will be here in about a week. I will just need a nice day when I can unload everything on to the driveway. It will take twice as long to unload and load everything as it will to install the new part. I hate plastic parts.


Wednesday, November 4, 2020

November 4, 2020 - They're BACK!!!!

For the last several years we have been fighting beetles that look like lady bugs invading Marge. On our last winter trip to Florida. as we headed South and the RV warmed up inside, the beetles came out by the hundreds. Literally. We were in Florida for several weeks before we finally eliminated all of them. They are attracted to warmth and to the color white. Here is a picture of some of them I took on the ceiling yesterday.


We are not looking forward to residing with them until we can get rid of them. We can't just smash them for two reasons - they stink and they leave a stain on the area where they are smashed. We found the best way to "catch them" for annihilation is with a wad of Duck Tape. We gently press the sticky take against them until they are stuck. I used a loop of take yesterday to eliminate a couple of dozen inside. We can't reach the ceiling without a step stool, which makes catching them a pain. I need to work on a stick to reach them but I haven't figured out how to hold the Duck Tape on the stick until it is full of bugs then discarded. I need to work on that soon.

Here are a couple pictures of the beetles today on the outside on the rear cap. There are hundreds of them everywhere. 


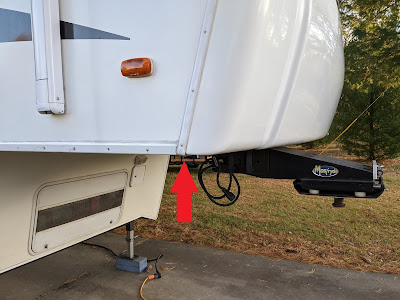
The other day I tackled another outside project. Many of the screws holding a seam strip on under the fifth wheel had broken off over the years. Here is a picture of the area with the red arrow pointing to where the strip is bent and goes under the fifth wheel to seal off the front cap. The screws that broke off were between this corner and the hitch on each side.

.

It is always hard to drill up because it is hard to apply pressure. I counted nine screws broken off that needed to be drilled out. I knew it would be a pain to drill new holes for new screws and I wasn't wrong.  I broke three drill bits but eventually got new stainless steel screws in place. Here is a picture of a section of the completed work.

The area needed to be cleaned and caulked. Of course I can't get the proper caulk in town so I had to order a tube online. The caulk arrived from Amazon yesterday so today I cleaned the seam area with alcohol and caulked. Here is a picture of the caulked strips. 

Another project completed thanks to nice weather. Now I need to get busy and invent a beetle killer stick.


September 6, 2024 - October 11, 2024 - Homer Repair and Florida Hurricanes

  My Blog Reflection We cannot do everything at once, but we can do something at once. Calvin Coolidge September 6, 2024: The transmission s...