Fashion Show:
The Ladies Club here at the park held a "Fashion Show and Luncheon" fundraiser on the 16th. About sixty women attended so it was a success. Here are a couple of pictures someone took of Kelly at the event.
Board Meeting:
Tuesday morning there was a park board meeting so I attended my first one. The meeting was short and sweet because the Minutes and Treasurer's Report had been sent out to all residents ahead of time. This is what a board meeting for a mobile home park is like. They announced that four more ceiling fans were installed in the clubhouse hall. They then discussed security and advised that the adjoining park, Sunset Palms, will be installing a locked gate on the Walmart path between them, us, and Walmart. This action is being taken due to multiple and continuing thefts throughout their park. Hereafter for us to enter their park from the Walmart path, we will have to call someone we know in the park to buzz us in. Thankfully our park has not experienced the same level of theft issues. Hopefully their security move will not move any perpetrators into our park. Time will tell. The board then informed everyone that they had signed a contract with T-Mobile for the installation of fiber optics throughout the park at no cost. To recoup their investment T-Mobile wants residents to sign up for internet, etc. We use Spectrum cable so it won't affect us.
Fan Reinstall:
You will recall I installed a new ceiling fan in the master bedroom a few days ago because the old one hummed. The install was a pain because the fan hangs over the king size bed. The mattress is too heavy and too large for us to move out of the way and there is little room to move it in the room anyway.
The new fan is much heavier than the one I took down. It was only supported by the electrical box, which was screwed to two boards laying on top of the Celotex fiberboard ceiling material. Celotex is a cheap compressed saw dust type product, which is quick to install and provides a little insulating value. It was used in mobile home ceilings for many years between roof rafters. Plastic strips cover the nailed joints. The stuff has no strength to it at all. This is what it looks like on the ceiling.

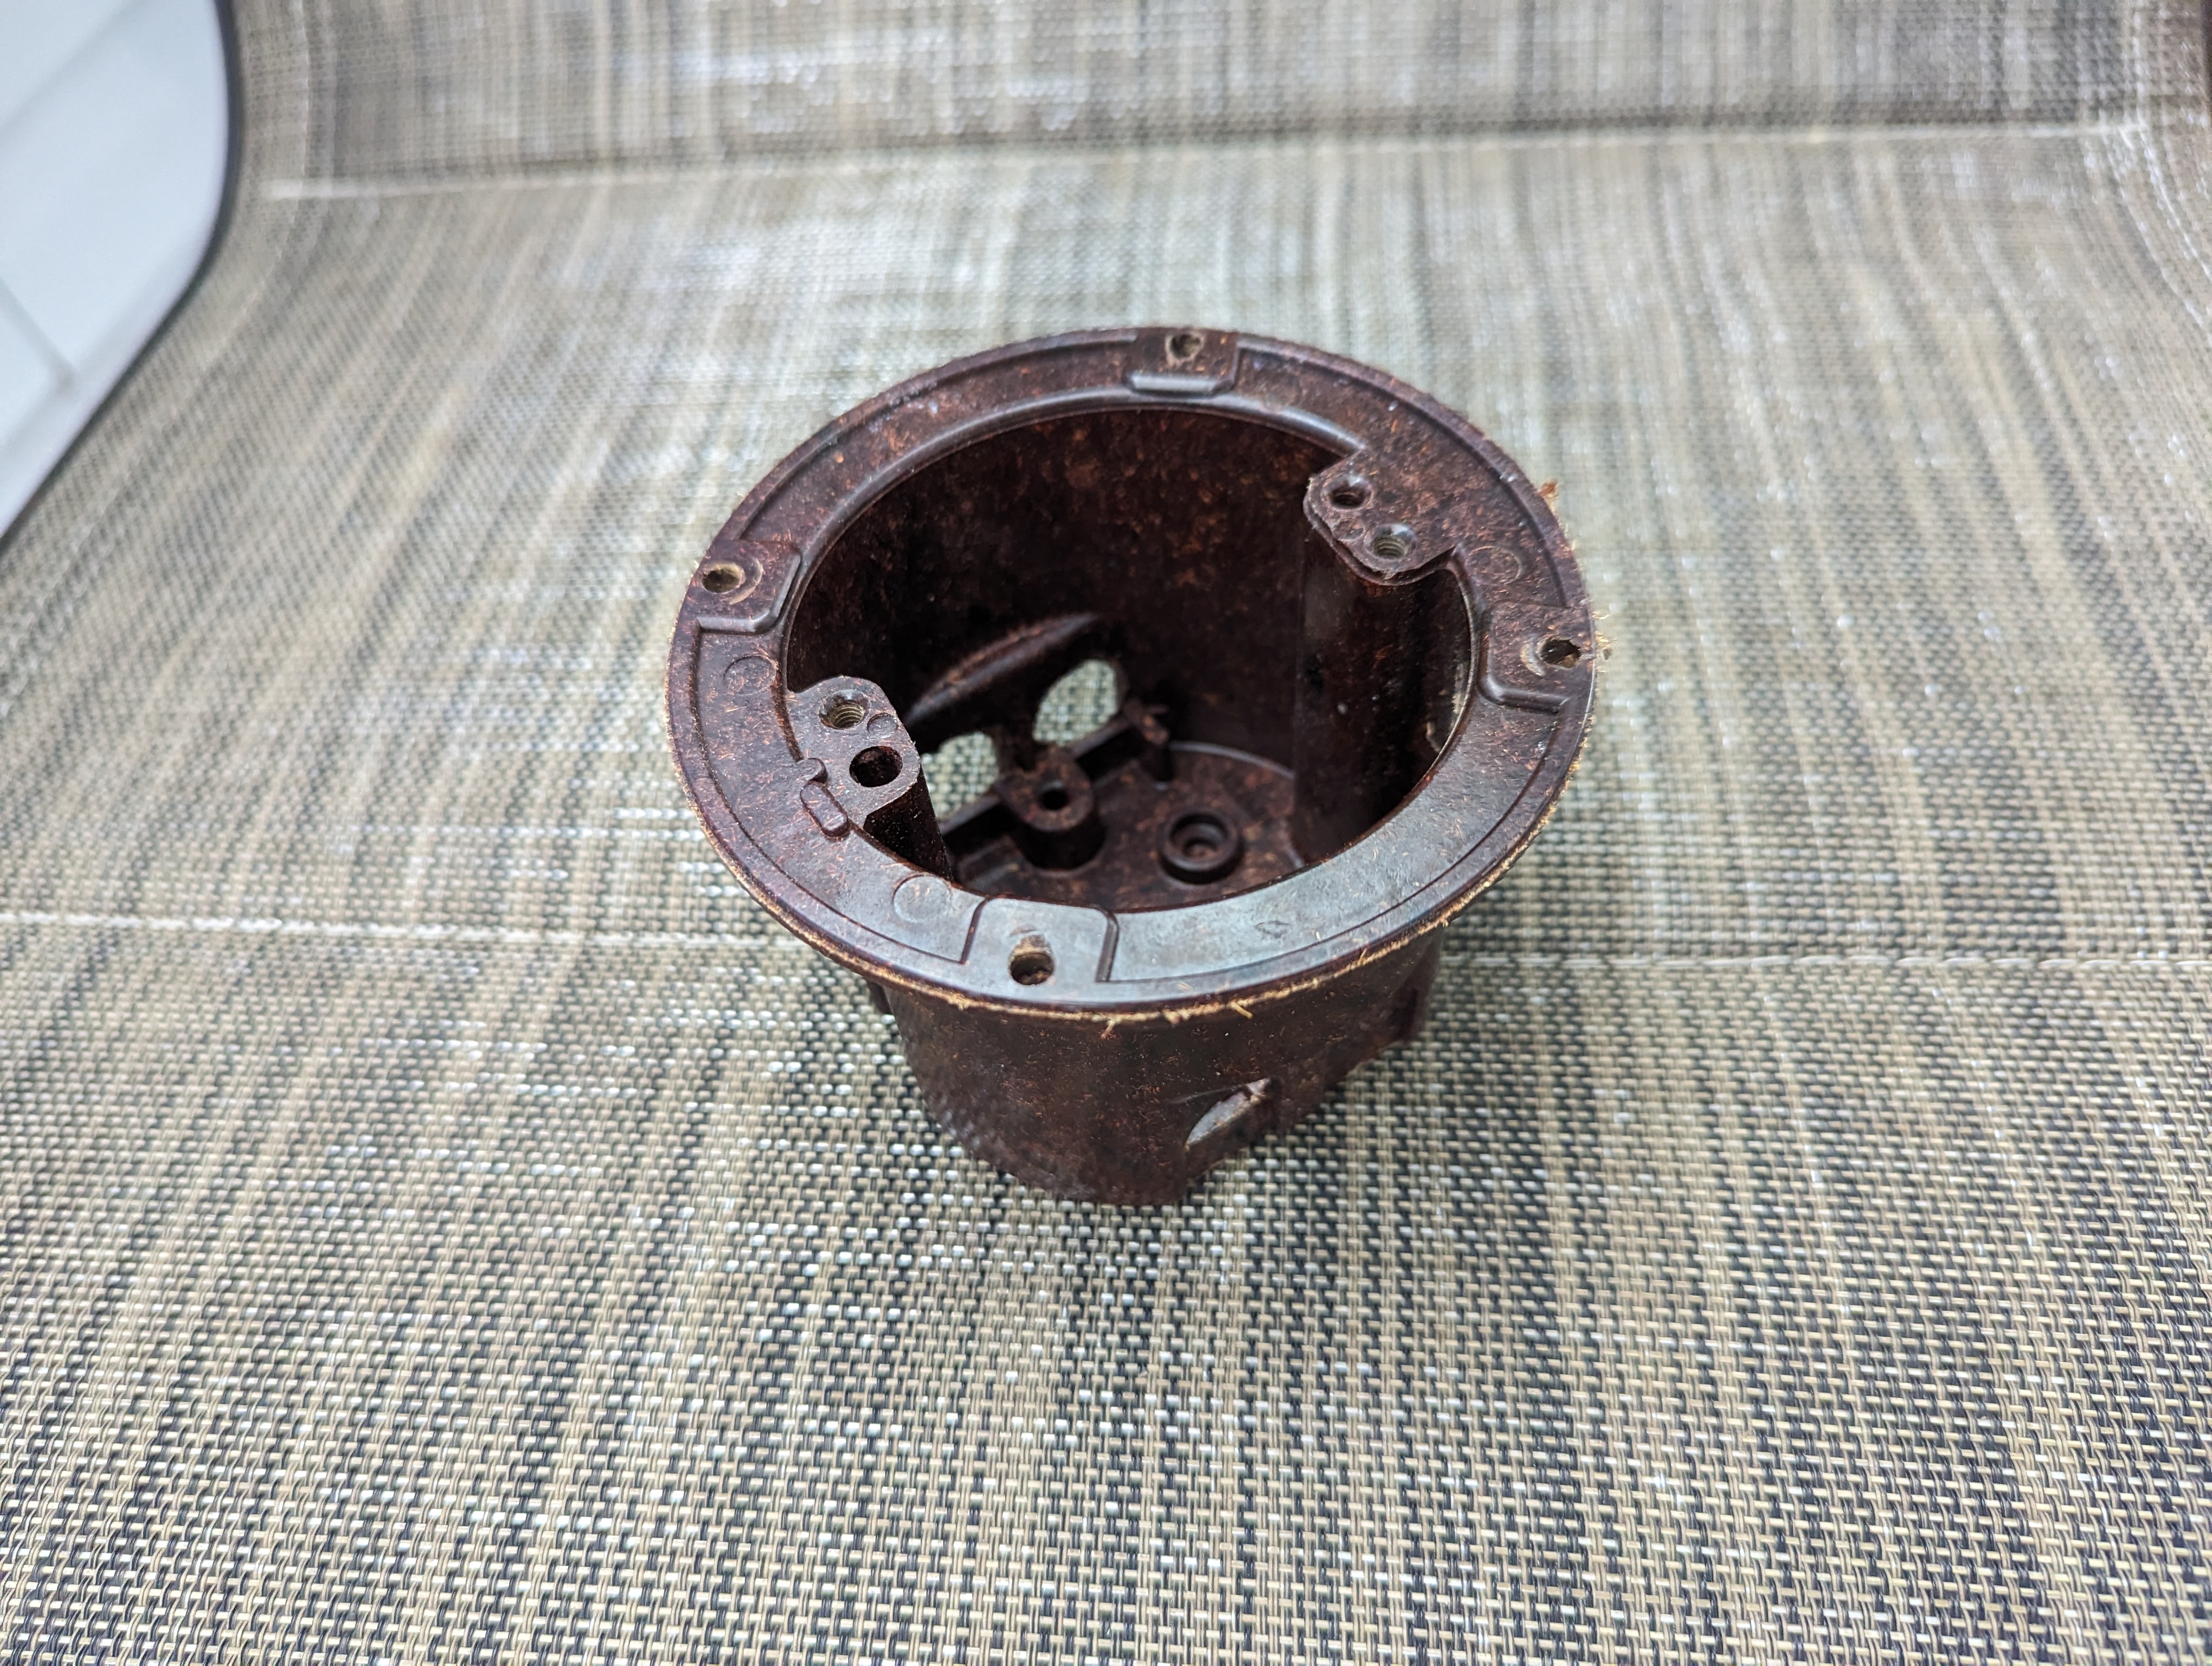
Considering the additional weight of the new fan and its vibration from operation, I was not comfortable at all with my install. In addition to the Celotex not providing support for the weight of the fan, the electric box the fan bracket screwed into is made of Bakelite. Bakelite is a predecessor of plastic from the 1950s and is known for becoming brittle and breaking with age. It was used mostly for radio and clock cases, back in the day. I had never seen an electric box made of Bakelite before and didn't know any were used after the 1950s but here it is after I took it out.

Celotex has been out of business for years so replacement material is not available if any is damaged. It is not a material that can be "patched" and still look right. Without taking out part of the Celotex ceiling to install a board from rafter to rafter to support the fan, my only option to provide support for the new fan was through the four inch electric box hole in the ceiling. In this case a hole was cut in the Celotex in the center between two rafters. At the time the electric box was only intended to support a lightweight ceiling light. For the previous fan installation someone had laid two 3/4 inch boards on top of the Celotex and screwed the electric box to them. This did spread out the weight of the fan a little but not enough for this much heavier fan.
In home construction now a ceiling electric box for a light is nailed to a rafter. If that were the case I could have bought a metal bracket which is made to screw into the rafter, below the electric box, to support a fan. A very quick and easy installation. I wasn't that lucky. Upon researching the matter I found a "Ceiling Fan Support Box with Brace Kit" for remodel applications. I went to Home Depot and bought one. Here is a picture of it on the box.
Here is how it works. You take out the old electric box. You then feed the square bar with end brackets containing spikes up through the four inch hole. Once you get the mechanism in place you turn it by hand until the spikes on each end pierce the wood rafters. Easy enough, right?
WRONG! Getting the bar in place at the right height, while keeping it perpendicular to the rafters,
and centered over the four inch opening, proved to be a major challenge.
You will recall that the install was over our king size bed. To reach the electric box area of the ceiling I had to stand on a step-stool and hang over the bed, and or, stand on the mattress, which provided no support as I moved around on it. For this reinstall, to help make mattress standing easier, I laid a piece of 1/2 inch plywood down on the bed. My theory was that this would spread the load from my foot steps giving me a more stable work surface. It helped but not as much as I had hoped. While my feet didn't sink into the mattress, the entire board moved around, giving me a fluctuating work surface. Not ideal at all.
Each time I would get the mounting bar in place and start turning it, it would move around until the points pierced the wood rafters. Many times the bar didn't grab the rafters where I wanted it to. The problem was I could only get one hand through the four inch hole. If I could have gotten two hands through the hole I could have held the bar in place with one hand and twisted it tight with the other.
It took me well over an hour to get the bar in a close enough position, left and right, up and down, that I could place the electric box mounting bracket over the bar and work to align it for mounting of the electric box. It took another hour to get the electric box bracket located in the correct position on the bar for the bolts on the mounting bracket to line up with the mounting holes in the electric box. Once this was finally accomplished I had to take the electric box back out and thread three Romex cables through the box before bolting it on. Once the cables were inside the electric box I had to then push the box up, align it with the bolts sticking down, and then thread a nut on each bolt to secure the box to the support bar above. All this had to be done while balancing myself on the mattress with my head cocked at what felt like a 90 degree angle to see up into the box. Not easy and not fun!
Standing on the plywood I was too tall to see directly into the box to align the bolts. To help make this alignment I put the step-stool on the plywood so I could then sit on it, cock my head back, and look straight up to align the bolts. While doing this, at some point, I guess I leaned too much and the step-stool kicked out from under me and sent me flying to the floor. Luckily I landed on my back and didn't hit my head. I did scrape my leg but didn't see any blood. The next day I did have a sizeable bruise to show for it.
Naturally, Kelly was quite upset with me for being on the step-stool in the first place. After falling I took a long break to regroup. Kelly then stood on the ladder while I stood on the plywood on the bed to get the bolts lined up and the nuts installed. Her smaller fingers helped. The actual installation of the fan after that was a breeze.
The entire reinstall took me all day and I was completely beat by the time it was finished (and a little sore from falling). But I can now sleep at night knowing the fan won't fall on me. LOL. It was a long day so Kelly and I just threw all the tools in the shed until the next day.
No matter what, this is the last project for this season! LOL
Dinner for Friends:
Four of our long-time Michigan RV friends from Roberts RV Park, Lee and Sherry, and Terry and Julie, have been down for the season in their fifth wheels. They are staying in Avalon RV Park in Clearwater, Florida, about ten miles from us. They love the new park and will never go back to Roberts, nor will anyone else we know.
Thursday evening we invited them, as well as our Missouri friend, Celina, over for supper. We had ribs, homemade potato salad, Pork and Beans, and French bread. Everything was delicious. After a respite to let it all digest, Kelly served chocolate cake to those interested. We had a great visit and look forward to hanging out with them more next season. I was so busy visiting that I neglected to take any pictures!
While riding around on the golf cart showing Lee and Terry the park, we ran into "Tommie". He is a fellow who lives in our park and works on golf carts. I flagged him down and asked him if he would drive my cart to see why the acceleration is so jumpy. He did so and immediately said that two of the five solenoids, which kick in at different power levels like gears in a transmission, were bad. He pointed out the ones I need to replace. He also told me I could get a whole new set of five solenoids for around $65.00 on Amazon. I thanked him profusely because I was thinking the problem was the electronic foot feed control, which costs about $325.00. Here is a picture of the solenoids which sit behind the batteries.

The four solenoids on the right look to be original. There are nuts and bolts on each of them, top and bottom, all of which are quite rusted. It could be a challenge to get these nuts off to install replacements. I sprayed all the nuts with "Blaster Penetrating Oil" to get them ready to come off in the future. This will be a project for next winter.
I fibbed about no more projects this year.
Friday I worked on a few minor projects. The first was to open up the electric service panel and torque all the bolts, particularly the neutral bolts. Over time these bolts can become loose due to the heating cycles of the wire. I brought down my torque screwdriver for this purpose. There were several neutral bolts (white wires) that weren't sufficiently tight. I'm glad I checked this out. I'm told that lose wires can cause fires due to heat build up.

Scuffed Wall:
Some time back I had found a partial can of paint marked "bedrooms" in the shed. Upon opening it I found some paint inside that was good but the lid area of the can was so rusted I couldn't close it back up properly. I found an empty jar and put the paint that was left in there for touch ups.
I decided to paint the area of the wall which we scuffed with the bed frame when moving the bed to a different location some months back. Here is the before and after picture. It looks much better.
Kitchen Cabinet Doors:
The next project was to repair a couple of the kitchen cabinet doors and drawers. The cabinets are made of MDF (a dense particle board) covered with a molded white plastic giving them a waterproof surface and wood grain effect. The edges of the plastic on a couple of the drawers and cabinet doors have shrunk due to heat and other issues. (I hate plastic, remember?) These edges have pulled loose and some pieces on the edges have even broken off. This is the edge of the door next to the stove.
I first tried to glue the edge with "Crazy Glue" because it dries quickly. It didn't work at all. I then tried E6000. My good Michigan friend, David, had told me about this stuff and it is great. I have found that E6000 sticks to many plastics and other materials that most glues will not. Since it sets up much slower I used wax paper and painters tape to hold the plastic in place until the glue set. I let it sit overnight.
The second cabinet door was a bit more of a problem to repair. The plastic had come loose further up the front of the door. I put it in the vise, and, being careful not to break the plastic, poked E6000 down as far as I could with a screw driver. I then used C-clamps and a strip of wood to hold it in place. Once this dried I used E6000 on the edge. It didn't come out perfect but it is never going to be.

The final door I did was also next to the stove. This time I decided to leave the door mounted and glue it there.
I am seriously thinking of removing all the doors and drawers next year and painting them to eliminate the delaminating plastic covering.
Totes:
For our first full season in the house we had lots of items to bring down. We used trash bags an totes for many items since most were hauled down in the bed of the truck. Two of the totes were filled with tools and items I brought down for projects. These need to be taken back home. I ended up having four two empty totes that Kelly can use to start packing for home. I put all of the clothes and other items that I am taking home in the large suitcase Alexa left here at Christmas. My goal is to leave all the clothes and shoes that I need down here so I can travel "light".
The totes are old and I had to use Duck Tape to repair one for the trip home.
Swivel Rocking Chair:
In the last week we noticed that one of the swivel rocking chairs on the lanai leaned back way too easily, almost overturning. Yesterday I discovered why. One of the fiberglass springs had broken and was pulling loose. Another project for next year. I have laid the chair down so no one sits in it.
Sunday after church we went to see the movie "One Child". It is a story about Nicolas Winton, an Englishman who rescued 669 children from Czechoslovakia just before Hitler invaded. He lived to be 106 and met, as adults, many of the children he saved. It was a good movie.
Not even a full week left before we leave on Thursday so no more blogs until I get home. Hope you have enjoyed my Florida blogs.
.JPG)
.JPG)


.jpg)
.jpg)


.jpg)
No comments:
Post a Comment