Thursday, September 24, 2020

September 23-24, 2020 - Homer Vents and Edger Repair

September 23rd:

During our last campout at times we had a sewer smell in Homer. I thought maybe it was because the tanks were getting full. When this happens sometimes the vent pipe gets blocked and the smell comes back inside when the toilet is flushed or the other drains used. We dumped the tanks when we left the lake but when he was closed up there was still a bad smell sometimes. 

There are two waste vents. One for the black (toilet) tank and one for the gray (sinks and shower) tank. The usual reason for a smell is that a vent is blocked for some reason. I decided yesterday to see if I could run water down the vent pipes to determine if one or both vents were blocked. The vent pipe caps on Homer are a little different than most. Here is a picture of the type of vent caps on Homer.


It has a removable top section but when it is installed all screws are caulked over so that it does not leak. Because of this the top cap cannot easily be removed to put a water hose down the pipe. I'm afraid if I scraped off the caulk from the top cap mounting screws the 27 year old vent cap would be history and I would have to install new caps anyway. In an attempt to get around this problem I adapted a small piece of clear tubing to the water hose and tried to push it up in the gap between the top and bottom sections of the cap to get water into the vent pipe. I was unsuccessful. 

There is a new style of cap called a "360 Siphon Vent Cap" which uses the Venturi effect to eliminate tank smells. As air goes over the opening it pulls air out of the vent pipe. They are also nice because they cannot be clogged up by bugs. I put one on Marge some years back and it has worked well. Here is a picture.


I ordered two of these yesterday along with several tubes of caulk to waterproof them after installation. Once I have the old caps off I can run a hose down each vent to make sure the pipe is clear all the way to the tank. If blocked I can work to open them up. Once I am sure they are venting as they should I can then install the new caps and the smell issue should be solved. Installation to follow upon arrival of parts.

September 24th:

Today I cut the grass and edged everything with my 30+ year old John Deere edger. I just spent $65.00 a couple of weeks ago to have the carburetor rebuilt due to old age. It is a beast of a machine and makes edging fast and easy so it was worth the money to fix. Today while I was edging it was throwing debris on me. Upon examination I found that the blade guard had moved down. Upon examination the reason was that it was cracked in several places which allowed it to slip out of position. I had welded this guard once before many years ago. Here is a picture of the current cracks. It cracked in the middle, next to the old weld, and on the right side.


Here is a picture after I welded it today. It's not pretty but it is thin metal so I built it up on the outside for strength.


On the edger one of the back tires had cracked open a couple of years ago. I filled the tire crack with spray foam and it worked until today when chunks of the tire just fell off. Here is a picture. No more fixing it. A new wheel and tire is needed.


I thought it would be an simple matter of buying a new wheel and replacing it. Not my luck. I looked on the internet and all tires were 7 inches or 8 inches and all had 1/2 inch axle openings. On this edger the wheel measured 7 1/2 inches and the axle was a little over 3/8ths of an inch in diameter. I went to Buchheit's and luckily they had a 7 inch wheel which actually measured 7 1/4 inches, close enough. The problem was the axle bore was 1/2 inch just like all those on the internet. I bought it anyway thinking it might work. I put it on the axle and there was a lot of flop. It probably would have been okay and outlasted me but it wouldn't have been right. I went back to Buchheit's and purchased a brass bushing which was 1/2 inch outside and 3/8 inch inside. Here is a picture.


I thought this would be perfect. It wasn't. The 1/2 inch outside diameter fit the wheel fine but the 3/8 inch inside diameter was too small for the axle. I attempted to drill it out on the drill press but the metal got too thin and it was destroyed. I then looked around the shop for another option. In my plumbing drawer I found two brass compression nuts for water lines that, with a little drilling, fit on the axle fine. Here is a picture.


I was able to drill out the center of each nut to a size that fit the axle and then I rounded off the corners on the grinder to make my own two-piece bushing.  I pressed them into the axle hole of the wheel and the new wheel fit on the axle perfectly.  

I had some John Deere yellow spray paint so I decided while I was doing this to paint the weld on the guard to keep it from rusting and to paint the new white wheel to match everything else.  Here is a picture of the edger with the new wheel and repaired guard back in place. It should be good for another thirty years.


Tuesday, September 22, 2020

September 22, 2020 - Homer Repairs: Tire Leak, Hubcap Repair, Door Light Replacement

In May I purchased all new tires for Homer. The day after bringing it home one tire on each of the rear duals was flat. I took it back and they found one had a bad valve stem and one had a leaking valve stem extension. I gave them another valve stem extension I had on hand to fix that problem. A couple of weeks ago before, heading out to the lake, I showed Alexa how to check the air in the tires. This is very important to keep the tires aired up properly in motorhomes because of the weight on the tires. We found that one of the rear dual tires only had 60 lbs. of air in it rather than 75 lbs. meaning it had a slow leak. We aired it up and went to the lake. Today I decided to check out the leaking tire which was back down to 60 lbs. It was the driver side outside tire that was leaking. I jacked Homer up and pulled the wheel off for an inspection.  On dual rear wheels it is very hard to get to the valve stems to check the air and to fill the tires. So on Homer there are extensions on each tire valve stem that come out and attach to the hubcap. This makes it very easy to check air pressure but the problem with these extensions is they are prone to leaking. Here is a picture of the wheel showing the extension from the front.


Below is a picture showing the extension from the back. The extension has a sharp bend in it so that it can get through that hole in the wheel to be accessed from the front.
 

The connection at the elbow above by the arrow was a little loose so I tightened it with a pliers the best I could hoping this is the cause of the slow leak. I will check it tomorrow to see if it holds air. If any air leaks off I will have to buy a new extension. Unfortunately you have to buy all four for the dual wheels so it gets rather expensive.

To get the wheel off you have to take the hubcap off. It is held on with two bolts which thread into a plate mounted on the wheel lug nuts with two thin nuts. Several things happened when I pulled off the hubcap. The first was that apparently the tire installer lost one of the flat nuts that hold on the plate and replaced it with a lug nut, which is three times as thick. The thicker nut would not allow the hubcap to seat properly against the wheel plate. Here is a picture of the original nut and the lug nut he put on there. You can see there is quite a difference in thickness.


I went to Buchheit's to see if I could buy a thin nut and I could not so I cut the lug nut in half and will use it. To help tire installers in the future I painted both halves red so if he dropped it he could find it.

The second problem I found is that one of the brackets that the air valve extensions connect to had come loose.  It was riveted on and apparently the rivets were pulled out when the tires were changed or it came loose from old age.  Here is a picture with an arrow pointing to the missing bracket. You can see the bracket sticking out on the opposite side.


The valve extensions are mounted through these holes.  Fortunately the bracket was not lost. It was being held on by the valve extension nut.  Here is a picture of the hubcap with the bracket missing. 


I took the hubcap and riveted the bracket back in place. Good as new. When I did that I noticed that the tire installer had put a pretty good sized dent in the hubcap. Clearly this was done by a tool or something being dropped on it. Here is a picture.


With a wooden dowel and hammer I pounded out the crease the best I could. Here is a picture.


One shouldn't have all these issues when paying $1,800.00 for new tires. They should do a more professional job but that is what you get. I had already reinstalled the front hubcaps which he installed improperly.

Interior light:

Yesterday John and I had looked at the small light fixture on the inside of Homer's entry door. The light comes on when the screen door is opened. It is very nice to have at night because it lights up the interior steps. The light fixture is only about 3/4 of an inch by two inches. The incandescent bulb in this little fixture gets very hot and over time it has melted the plastic fixture. Surprisingly it was still working. John thought he had an LED bulb and socket which would fit and he brought it by this morning. LEDs burn much cooler than incandescent and use less power as well. We cut the wires to the small fixture and took it apart. Here is a picture of the bulb section. At some point it was going to short out I'm sure.


Here is a picture of the fixture with the LED socket and bulb installed and a piece of black plastic over it to help reflect the light downward.


Here is a picture of the fixture re-installed over the door with the LED light burning. A nice improvement. Thanks John.


Sunday, September 20, 2020

September 20, 2020 - Key for Homer's Spare Tire Cover Lock

The local locksmith could not make a spare key for Homer's spare tire cover lock BUT when they took a picture of the inside of the key there was a number "715" stamped in it. I got online and found two of the "715" keys for $3.99 each plus shipping. Cheap enough. I received them promptly and checked them today to make sure they worked. They both worked fine.  Here is a picture of the new key.


Here is a picture of the spare tire cover in place.


Here is a closeup picture of the lock itself. It's mount shape is molded into the fiberglass so getting a different lock to replace it and to make it look right may have been a big problem. I'm glad I didn't have to fool with that.


I re-thought my prior idea of hiding an entire set of keys on the outside of Homer. I really don't know why I did when all I need is the door key to get inside. I can retrieve a set of keys inside which are out of the weather. I purchased a magnetic key holder and have hidden it on Homer with only the door key in it. I shouldn't have to worry about key corrosion any more.


Tuesday, September 15, 2020

September 15, 2020 - Campout at the Lake and Newly Discovered Homer issues

Saturday we went out to the lake lot to camp for a few days. We had a great time, the weather was gorgeous. I caught a nice Bass but threw it back. Kelly caught a nice Bluegill and threw it back as well. (We didn't fish hard.) I took two rods and one broke. 

Before leaving today we needed to dump the sewer holding tanks. When doing so I discovered that the pipe strap was gone that held the sewer pipe to a 2 x4 brace from the floor above. I have no idea how long this strap has been missing but it is important to have the sewer drain pipe secured and not bouncing going up and down the road. It could crack or worse yet cause the holding tank to crack.

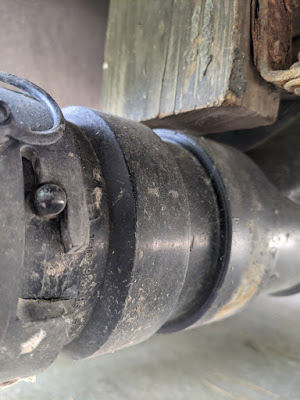
This afternoon I crawled under Homer to study the situation. Here is a picture of what I found. You can see on the first picture where the pipe strap broke off on one side. The second pictures shows the other side where it broke off under the "L" bracket holding the cleanout hose fitting. 


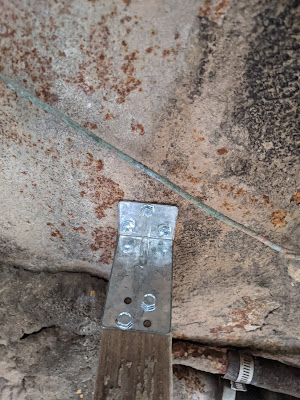
The 2 x 4, which is screwed in from above, was loose as well. I have no way of getting to the top of the 2 x 4 it from above so I decided to add an "L" bracket to give it more support. Here is a picture of the "L" bracket installed.

From underneath all I could screw into was the sheet metal floor. It was the best I could do because I didn't want to drill deep holes and maybe hit an electrical wire or a water pipe. I then got some pipe strap and installed it around the sewer pipe with a piece of rubber to cushion it.  Here are pictures from each side.


I spray painted the strap so that it blended in more and to protect it from rusting.  Here are pictures from each side.


I am really glad that I caught this problem before any damage to the pipes or the holding tanks. That type of repair could be big money. This I fixed with hardware around the shop.

While fixing the pipe strap issue I found another problem in the immediate area. There was a safety ground just dangling near the sewer pipe 2 x 4 mount.  The sheet metal it was screwed to had rusted away. Here is a picture.

I don't know why this safety ground is in this area under the kitchen cabinets and only secured to the sheet metal floor. Less than a foot away it disappears into a wire loom so it clearly has a purpose. I was able to get the bolt out, grind the area to bare metal, and reattach it with a new screw.  Here is a picture


I then spray painted it to protect it from rusting for a while. I still need to do something to close up the rusted out area. I'll think about that. Maybe a little piece of metal inserted in there and held in place with JB Weld.

Believe it or not I then found a third issue in the same area. The prior owner installed a sewer hose carrier to store the sewer hose in a tube under the motorhome. I accidentally pushed against it while under Homer and it moved. I soon realized that the outside mounting bracket was not attached to Homer as it should be. I discovered one screw hole but no screw on either side. Here are pictures. It is hard to tell how long this has been loose as well.


I attached it with self-drilling screws. Here is a picture all secured.


All the issues on Homer fixed I moved to seeing if I could get the leaf blower to start. It died on me out at the lake and I couldn't get it restarted. I took the air cleaner off and spayed some carburetor cleaner in and pulled on it several times. It caught once and that was it, even though I pulled many times. In fact upon pulling the rope, it totally frayed so that it would not got back into the housing for another pull.  Here is a picture with the frayed cord hanging out.


My daughter Alexa bought me this Weedeater blower at least fifteen years ago. It has worked flawlessly and never refused to start until today. I made a bracket several years ago to repair the handle that broke and put new tubing to the carburetor.  It has served me well but it is clearly not worth repairing. At a minimum it would need the carburetor taken off and cleaned or replaced, a new start rope, and a new air filter. It is being retired to the dumpster. I have another much newer blower I purchased when we had the house in St. Louis. It is only about eight years old and will have to step up the plate.


Tuesday, September 8, 2020

September 8, 2020 - A new adventure for Homer and his Spare Keys

 Monday morning, for the first time ever, I let someone else use Homer. My daughter, Alexa, loves camping and asked about using Homer on occasion. I told her we would have to have "RV 101Classes" so she could learn about the various motorhome systems, equipment, and how to drive one. Monday was Class Two. She drove it out to our lake lot, about sixteen miles of curvy road, which was a good test. She did fine. 

Upon arrival she learned how to back it down the long drive using only the side mirrors and then how to level it by driving up on blocks, which is always tricky. After Homer was parked we went over how to connect the water and electric, how to roll out the awning, and how all the "home " systems operate. We left and she spent the night there with a friend. Everything went fine except this morning before leaving they couldn't figure out how to get the manual awning rolled back up. There are several steps involved so I can appreciate how it all didn't sink in the first time. She called to let me know they had to leave and that the awning was out.

I never like to leave the awning out when I'm not there because of possible wind gusts resulting in damage. So Kelly and I went out to get it rolled up. It wasn't an extra trip because the grass needed mowing anyway. Here is a picture of Homer enjoying himself in the shade when we arrived.


You will notice lots of leaves have fallen already. In addition to the mower I took the leaf blower along to blow all the leaves off the graveled area. If I don't do that in the fall they disintegrate over the winter and make lots of growing matter for weeds.

I had told Alexa to lock the keys in the cab, which she did. When we arrived at the lot it dawned on me that I had forgotten to bring along the spare keys for Homer.  All was not lost though because when I purchased Homer six years ago I hid a spare set of keys underneath. With some difficulty I retrieved that set to unlock him. I had never checked on the set of hidden keys, nor used them before today. I was shocked to see their condition. Here are a couple of pictures.


They were on a key ring inside a medicine bottle which was well secured with a "D" clip. There were just two small holes for the key ring to go through the lid and I really expected they would be better protected from the elements than they were. Look at the grit in the bottom of the bottle!!! I'll bet some of it is from our trip to Alaska. I was able to clean the cab door key enough to unlock the cab and retrieve the set Alexa left. 

When I got home I cleaned up the keys by soaking them in vinegar and then wire brushing them. All the keys cleaned up fine except the barrel key which locks the spare tire cover.  It is made from a pot metal and was basically eaten up by corrosion. Here is a picture. The red arrow points to an area of the barrel key that actually was eaten completely through.

I am pretty sure that I have one other barrel key stored inside Homer. I will check next time I go out to the lake. If I do I will retrieve it and see if I can get a duplicate made by a locksmith. I hate only having one key for anything. If I don't have another barrel key I will have a big problem figuring out how to get the locked spare tire cover off without damaging anything and getting a new lock for it. 

It was bad that the keys were so corroded but the good from this is that I learned of the corroded keys at home when I was not depending on them. I will have to figure out a more weather-proof way of hiding a spare set of keys under Homer.  Any good ideas are welcome.


Sunday, September 6, 2020

September 5, 2020 - Weiner Roast at Hershey Farm

Due to Covid we are doing no traveling this holiday weekend. Bob and Ronnie invited us out to a Weiner roast at the larger pond on their farm. Here is a picture of it as we approached from the top of the hill and then a closer view. It is only accessible with a four wheel drive vehicle.


It is a very relaxing, picturesque site. As you can see Bob keeps it manicured. We did a little fishing before eating. I soon learned that my fishing line was rotten because I hooked two nice Bass and both broke the line. After eating Bob took us for a ride to the top of the opposite hill to an overlook. Here are pictures of the pond from the other side.


On the ride Bob gave us a little history lesson about the Perryville-Greenville Road which ran through this farm many years ago. Thousands of people traveled this road by horse and by wagon. Here is a picture of part of one of the wagon trails.


At the top it drops down to cross a ravine and then up again on the other side. Considering the rough terrain travelers and their animals - horses, mules, and oxen, really had to be tough in those days to make this trip. Bob also showed us a spot in the woods where there were three different trails, side by side. If the trail washed out they would just move over about thirty feet and make a new trail. No roadbeds then like we are accustomed to these days. A trip that we can make in a couple of hours would take them days. It was fun, relaxing day.


Thursday, September 3, 2020

September 3, 2020 - New Igniter Installed in Homer's Stove

Today the new igniter arrived for the stove in Homer. The old one is a Piezo sparker and it only threw out a spark about one out of ten times it was pushed. It also makes a very loud popping sound when it is pushed. We always had to push it multiple times to get the flame to light. Here is a picture of it after I took it out. It's a pretty simple piece of equipment.


I replaced it with an igniter like the ones used on outdoor BBQ grills. The new one creates a spark via a AA battery. Here is a picture of it with the push button and battery removed before I installed it.


The BBQ igniter is much larger than the Piezo with the bulk of it being to the right of the mounting threads. This put it under the gas manifold. I had measured the area before I ordered it to make sure it would fit. I still had to take the manifold loose to maneuver the igniter into place. The diameter of the threads on the new igniter were larger so I had to enlarge the hole on the front of the stove to mount it. Here is a picture of the mounting hole before I enlarged it. Luckily I had a metal router bit to use in my drill for this purpose. It proved a lot easier than enlarging the hole with a hand file.


Here is a picture of the new igniter installed. It continuously fires as long as you hold in the button. This is a nice improvement over the old one which only sparked once and then you had to push it again, and again, and again.

Another 27 year old part replaced and improved.  Homer loves all the attention.


September 6, 2024 - October 11, 2024 - Homer Repair and Florida Hurricanes

  My Blog Reflection We cannot do everything at once, but we can do something at once. Calvin Coolidge September 6, 2024: The transmission s...